Showing posts with label Christmas. Show all posts
4/18/16

4 Photo Gift Ideas

Take a wooden crafts letter (we chose "M" for Mom, but her first initial would work as well) and paint the outside edges with a bright accent color; let dry. Print a variety of meaningful black-and-white photos. Cut the photos to fit the front of the letter and adhere each one carefully using a thin layer of decoupage medium.


Gather inexpensive supplies--cardstock, photos, photo corners, and ribbon--for this easy-to-make card and frame combo. Cut a sheet of cardstock in half lengthwise, and tape ends together to make one long piece. Fold every 4 inches. Attach photos with photo corners. Punch a hole in the back and thread ribbon through to wrap around the booklet.


Mom's homecoming will surely be more joyful with this fun wall hanging.
Simply paint ready-made medium-density fiberboard to your desired color. When dry, select one letter and arrange photos over it, taping together with low-tack artist's tape (available at craft stores). Carefully flip the photos and letter facedown and trace around the letter with a pencil. Remove the letter and cut photos along the traced line. Adhere the photo collage to the front of the letter with a decoupage medium. Remove low-tack tape from photos.
Start with a 14-inch pillow cover. Print 3x3-inch photos of you and Mom on iron-on ink-jet fabric sheets, cut them out, and iron them on a 12x9-inch felt sheet. Hand-stitch around the photo edges with floss. Punch holes in felt and fabric strips and attach the strips to the edges of the felt sheet with scrapbooking brads. Hand-stitch or use fabric glue to attach the embellished felt sheet to pillow cover; add felt die cuts. Finish by stuffing the pillow cover with fiberfill or a purchased pillow form and stitching the cover closed.


Source:BHG
12/23/15

Fun Holiday Candy Bar Wrappers

Make a  Penguin, Snowman or Reindeer candy bar wrapper for a whimsical gift that is sure to delight 


  1. Print HERSHEY'S Bar Wrappers templates from www.hersheys.com, and cut them out using a pair of scissors. 
  2. Wrap the label around a HERSHEY'S Chocolate Bar, making sure the front of the design is centered onto the bar. 
  3. Attach the label in the back with a small piece of clear tape.
  4. For the reindeer, cut a pipe clear in half and bend to create antlers. Then, slide the ends of each antler underneath the top of the bar wrapper.
12/12/15

Corkboard Christmas Card Display


Make a festive tree out of cork board to display photo's, Christmas cards or kids artwork
                  

1.You can find cork by the roll at most craft and office-supply stores. You will need one roll for this project.  Make your tree as big as you and your wall space desires.

2. Use a ruler to outline the shape of your tree.  

3. Cork by the roll easily cuts with scissors. Use the leftover cork to make a tree trunk.

4. Paint the tree. It may take two coats, let dry between coats.

5. Add a festive tree topper.

6. Hang the tree on the wall using small nails or similiar hanger.

7. Use decorative push pins for bling.


12/11/15

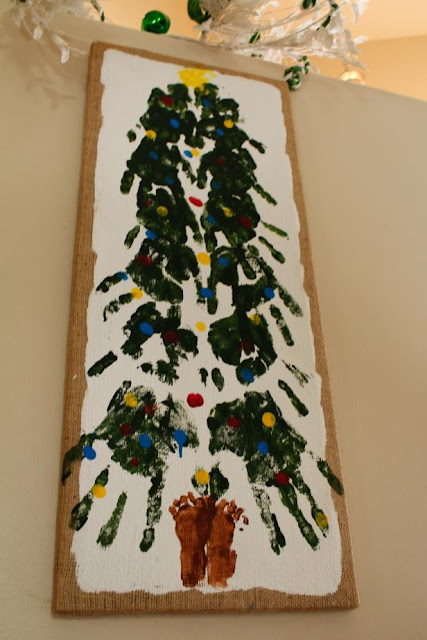
Memorable DIY Handprint Tree


This supercheap DIY project may be inexpensive to make, but it will undoubtedly become the most valuable Christmas Decoration you'll ever hang. Great for the kids and grandkids! 


What you need:
Foam brushes
Fabric Paint brown, green, yellow and colors for ornaments.
Canvas of some kind. burlap wrapped canvas Hobby Lobby.

How to:
You really have to be precise with where the footprints and handprints go! We practiced before on newsprint so that the kids knew exactly what to do.

The biggest tips are to just know exactly where you plan to place the prints, but as you can see, it is quite easy to do! The paint does dry fast, but you do want to wait between each set of colors to switch. Do the feet, wait for them to dry, then the hands and let them dry, then the star on top and you can do the ornaments while the star dries.  But because it dries so quickly, this project was completed in less than 30 minutes! Also, this acrylic paint does wash off very easily, which makes it easier to use with kids.


see article by Amy Latta @ HGTV


12/2/15

Two DIY Christmas Card Projects


                 Make something cute from extra holiday cards 


                                                                 Credit/Source: BHG

Spell out your holiday greetings with festive Christmas card blocks. Spray paint 1-1/2-inch wooden blocks with antique white spray paint. Cut 1-3/8-inch squares from six holiday cards so each side features a background from a different card. Use a die-cutting tool or stickers to make 1-inch tall letters. Glue the paper squares and letters to the blocks with a decoupage medium. Suggested words: Joy, Peace, Love, Hope

                                                               Credit/Source:BHG

Cut various size circles out of Christmas cards, scalloping the edges of some. From the center of each circle cut out a 3/16-inch pie-shaped wedge. Curl the circle into a cone shape (pattern side up), overlap the ends, and tape the back.

To make the base, cut a 2-inch foam ball in half and a 1/8-inch dowel to desired height. Place the foam ball flat side down, add a drop of hot glue to an end of the dowel, and push the dowel through the foam ball until it stops. Slide the largest cone shape down the dowel, and then twist a small rubber band around the dowel; continue alternating progressively smaller cone shapes with rubber bands. Top the paper Christmas tree with the smallest cone shape and a ribbon.
11/17/15

Entertaining Made Easy


You don't have to be a professional designer to bring artful elegance to your holiday table. Watch these two video's to learn how to set a special holiday table and how to welcome your guests the minute they walk in the door.


11/16/15

Holiday Entertaining


Tis the season to entertain. This video is full of great entertaining tips and tricks to make your holiday party fun and festive.


11/6/15

Elegant DIY Quilted Ornament


Make this elegant ornament 
What you'll need : A smooth foam ball, 6 pieces of fabric, cut to fit the design you’d like to create on your ornament.
Braided trim
Ribbon & pearl-tipped pin for the hanger
Scissors & glue


For a free pattern for this ornament, plus fabric-cutting template, visit theornamentgirl.com.
For complete how-to with pictures  click here

source: celebratemagazine.com

More from Festive & Fun